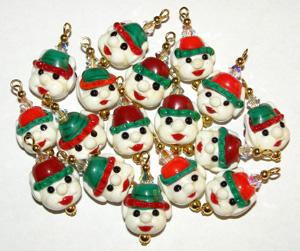
Recipe
for making an Elf's head bead:
Ingredients:
Glass
Rods: Ivory,
Medium Opaque Red,
Petroleum Green
Stringers: Black,
Light Ivory,
Dark Red,
Transparent Dark Green,
Transparent Striking Red,
Petroleum Green,
Encased Goldstone
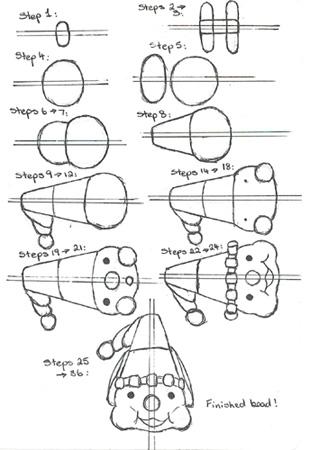
Method:
1) Make
a small bead in Light Ivory.
2) Marver this into a thin barrel shape.
3) Add glass to either end of the barrel shape to make discs
that stand perpendicular to the barrel bead, as in making a
hollow bead.
4) Melt these discs into the barrel to make a nice completely
round bead, take it out of the flame and keep rotating your
mandrel and let it cool slightly but not enough to crack.
5) Make another slightly smaller disc-shaped bead in either
medium red or petroleum green (depending on what colour you
want the elf's hat to be) to the left side of the ivory bead
on your mandrel about 1mm (at most) away from the ivory bead.
6) Melt this red/green bead towards the ivory bead - direct
your flame to the gap between the beads and the glass will flow
towards the heat - making sure the ivory bead does not loose
it's round shape or become over heated.
7) When the 2 beads are joined well together, take out of the
flame and let cool slightly while rotating your mandrel.
8) Reheat the red/green part of your bead and marver it into
a cone shape, making sure you do not marver the round ivory
bead part.
9) At this point you can add a further disc-shaped bead in the
alternate colour to what you already have on your mandrel and
marver it to make a higher, longer cone shape and a bigger striped
hat.
10) Add a blob of the last colour to one side of the outer edge
of your cone/hat, melt in slightly and flatten it with your
spatula/butter knife.
11) Add a dot of stringer in the next alternate colour on the
lower end of this flattened blob for another stripe to the hat
and melt in slightly,
12) Add a dot of encased goldstone to the top of this last dot
and melt in slightly for the bell on the end of the elf's hat.
13) Make sure you don't let the other ivory end of this whole
bead get too cold or it will crack….keep flashing it in
the flame to give it insurance heat whilst you are making and
shaping the hat.
14) Reheat the surface of the ivory part of the bead and flatten
it slightly with your small mashers.
15) Flame polish out the chill marks.
16) Add medium sized dots of light ivory to the outer right-hand
edges of the ivory part of the bead - these will form the elf's
cheeks - and melt in, but not all the way - leave them slightly
raised. Make sure these 2 dots are the same size or he will
have a lopsided face. It might help to use your spatula/butter
knife to slightly flatten the dots while they melt in.
17) Take the bead out of the flame and let cool slightly.
18) Reheat the ivory bead part just above the elf's cheeks and
using your bead-rake poke indents just above the cheeks where
his eyes will go.
19) Using your black stringer place small dots over the indents
and melt in slightly. If you miss the indents, use your spatula/butter
knife to gently push and flatten the black dots towards and
over the indents - a very delicate touch is needed here!!
20) Place a large dot using your light ivory stringer where
the elf's nose should be - slightly below his eyes and slightly
above and between his cheeks - and carefully melt in very slightly,
but leave most of this dot raised.
21) Using your dark red stringer add a tiny dot of dark red
directly below his nose to form his mouth and melt this flat.
22) Using your bead-rake, gently and carefully rake the very
outer edge of the elf's mouth, right at the point where the
red and ivory meet, outwards on each side.
23) Take the bead out of the flame and let it cool slightly.
24) Reheat the outer raked edges one at a time and gently rake
the point just on the outside of the extended parts of the elf's
mouth upwards into his cheeks to form his smile.
25) Remember not to let his hat cool down too much while you're
doing all this or it will crack.
26) Now take your dark red or petroleum green stringer - the
alternate colour to the first stripe of the elf's hat - and
lay down a stripe around the edge of his hat where it meets
his head, and melt this in slightly.
27) Using the transparent red or green - corresponding to whatever
colour you just used - lay down a stripe directly over the top
of this last stripe and melt it in very slightly.
28) Take your bead out of the flame and let cool slightly.
29) Using the pointy end of your bead-rake and holding it like
you would a knife, spot heat these raised stripes and indent
them with the side of the rake, a section at a time, all the
way round, to form the ruff at the edge of the elf's hat.
30) Next add a large blob of light ivory just below the edge
of his hat on each side of his head, melt slightly and flatten
with your spatula/butter knife to form his ears.
31) Add another smaller dot of light ivory to the top of each
ear and melt slightly.
32) Using the pointy end of your bead-rake, rake each top dot
upwards along the elf's hat to form his pointy ears.
33) Change the hold on your bead rake and using the long edge
lay it along the length of his ears to form the indented curve
of the elf's ears.
34) Using your tweezers spot heat the top of each ear and slightly
squeeze them together to give a sharper point.
35) Adjust any details that are not quite right - re-rake his
smile, adjust the bell on the tip of his hat, etc…..it
helps to hold your mandrel upright, then upside down too, to
see that his face is even here.
36) Now flame anneal the whole bead well before popping it into
the kiln to bake.
Voila! An
Elf's head bead!!
Have fun! Cheers!
Di. |
Steps
to follow from the Tutorial:
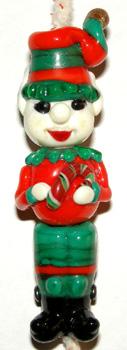
Full
Elf - isn't he the cutest?!
|